Spring Security 实现短信验证码和图片验证码登录。
参考文章:
- 添加图片验证码
- 短信验证码校验逻辑
- Spring Security中UsernameNotFoundException的解决方案
- Spring Security实现自动登录
- Spring Security 过滤器链
1. 实现原理
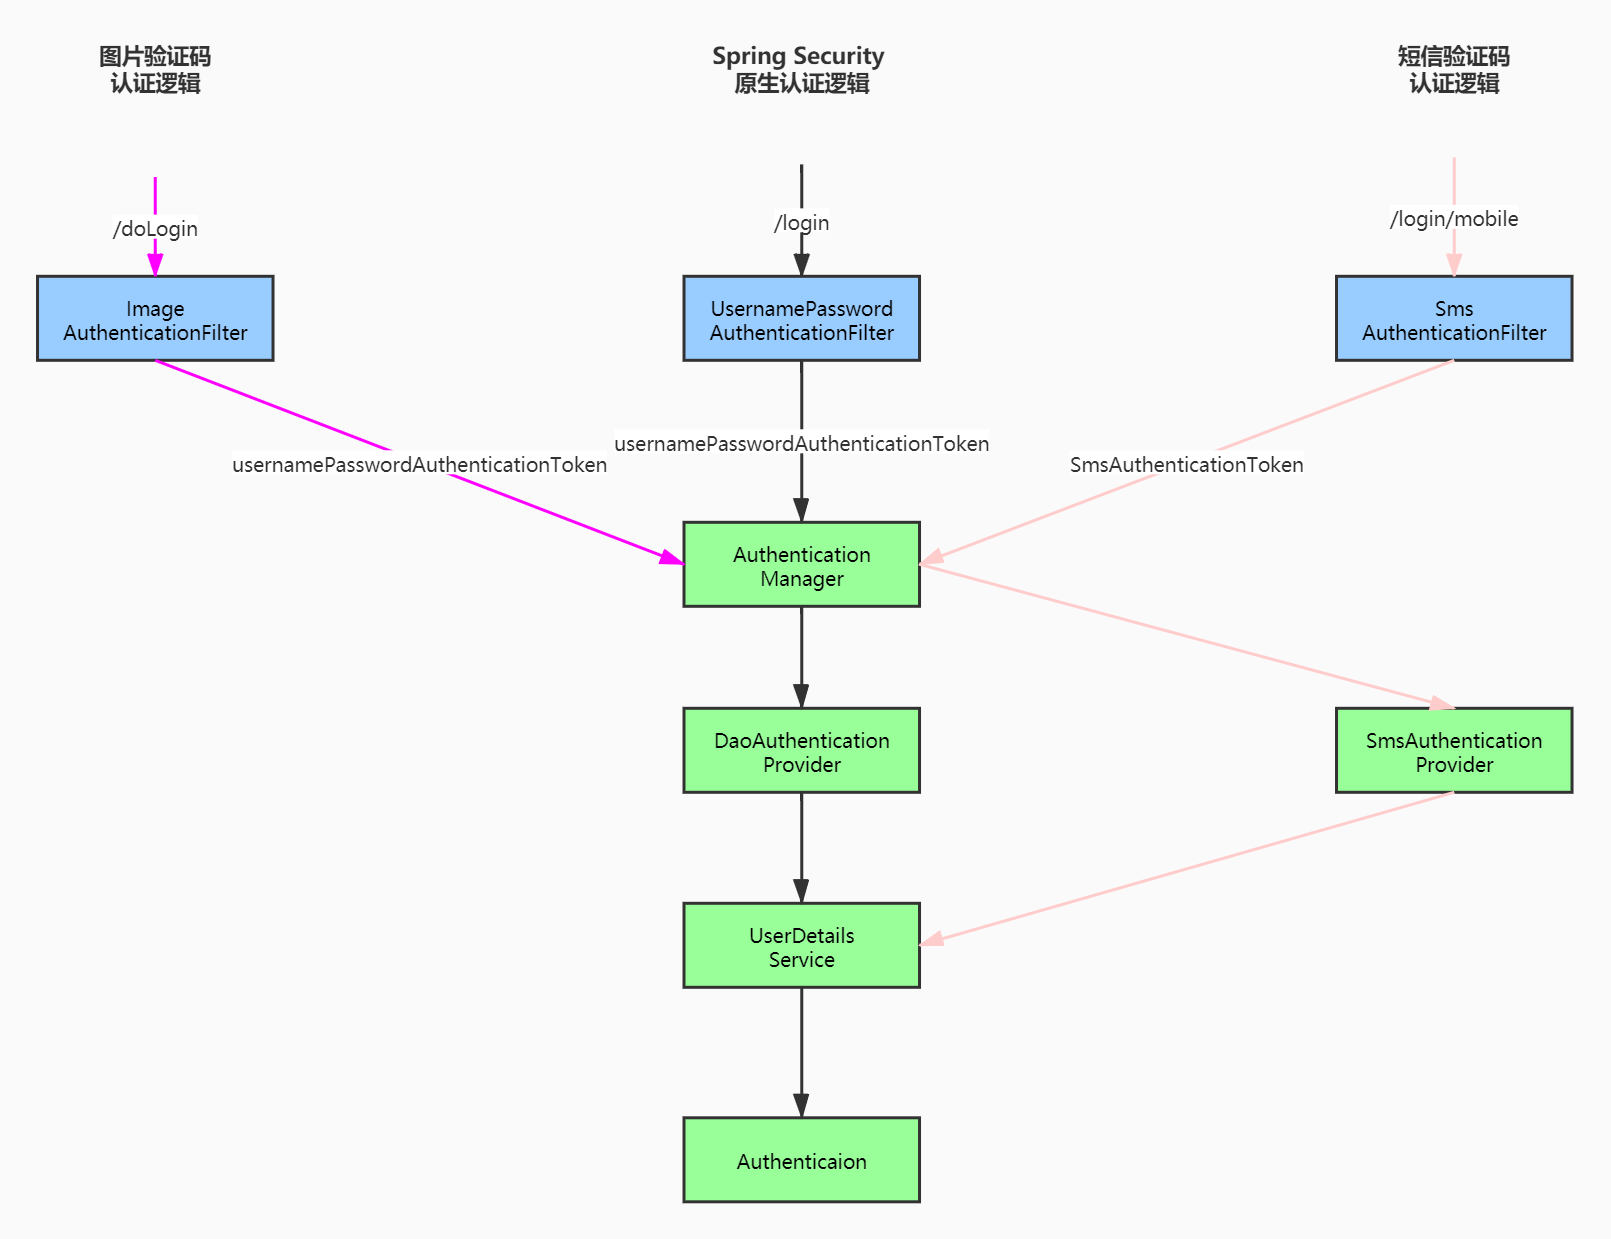
ImageAuthenticationFilter、SmsAuthenticationFilter在这两个过滤器分别校验了图片验证码和短信验证码。- 由于
Spring Security默认支持的是表单登录,项目中采用的是InputStream的形式来读取 POST 请求中的 JSON,所以就直接在这里校验了(流只能获取一次,如果在这两个过滤前再加验证码过滤器,使用流获读JSON,就会报错)。 - 图片验证码只需要自定义
ImageAuthenticaionFilter即可,然后将 filter 加入到 Spring Security 过滤器链中。 - 短信验证码需要自定义
SmsAuthenticationFilter、SmsAuthenticationToken、SmsAuthenticationProvider,然后将 filter 和 provider 加入到 Spring Security 过滤器链中。
自定义的 AuthenticationFilter 继承自 AbstractAuthenticationProcessingFilter:
- filter 必须要设置 AuthenticationManager 属性;
- requiresAuthenticationRequestMatcher 中保存 filter 拦截的请求路径;
- 当校验通过时就会进入到 AuthenticationSuccessHandler 中;
- 校验失败时就会进入到 AuthenticationFailureHandler。
更多信息请看 AbstractAuthenticationProcessingFilter 源码注释。
2. 验证码实现
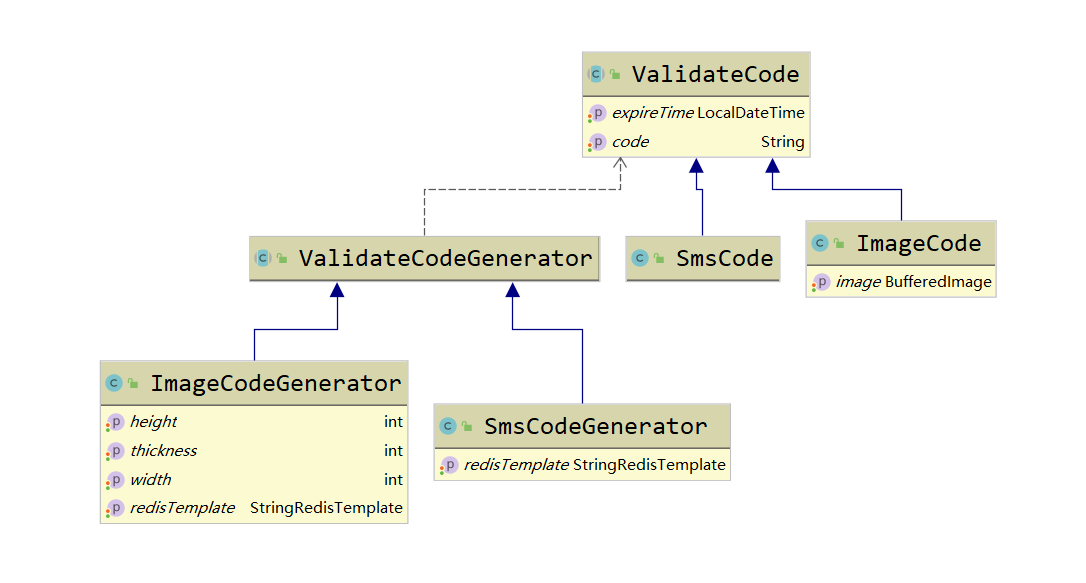
ValidateCode: 抽象方法,保存【验证码】和 【过期时间】。SmsCode: 短信验证码,直接继承 ValidateCode。ImageCode: 图片验证码,继承 ValidateCode,并且添加了 BufferedImage 属性,用于生成图片。ValidateCodeGenerator: 抽象方法,依赖了 ValidateCode,有验证码 生成逻辑和存储逻辑(项目中使用 Redis 存储)。
注意:图片验证码存储的 key 不是使用的用户名,而是【验证码类型 + "_" + 本次获取验证码的随机字符串(id)】。短信验证码使用【验证码类型 + "__" + 手机号】作为key来存储。
- 前端在获取图片验证码之前要生成一个随机字符串(唯一性),代表本次获取图片验证码的唯一标识。然后在请求带着这个字符串(项目中用参数 id 来标识)去请求获取图片验证码。
- 当校验图片验证码时,前端需要将这个 id 一起传过来,用于从 Redis 中获取存储的图片验证码。
/**
* @param id   前端传过来的随机字符串(用于生成key)
* @param type 枚举类型, 表示验证码类型
* @return 存在Redis中的key。如: sms_code_qwead、image_code_asdqwe
*/
public static String keyGenerator(String id, ValidateCodeType type) {
    return type.value + "_" + id;
}
3. 如何使用?
3.1. 开发环境
- JDK 1.8
- MySQL 5.7。
- Redis 6.0.4。
- Idea 2019.3.3 必须安装 lombok。
- spring boot 2.4.1。
3.1. 下载配置
# 1、下载项目
git clone https://github.com/RingoTangs/spring-security-login-demo.git

# 2、修改配置文件。idea 需要安装 lombok
# 只需要修改 datasource 和 reids 的配置

# 3、图片验证码可以手动开启和关闭(默认开启)
validate.code.image.enabled=true

# 4、创建数据库表(查看项目中的user.sql文件)

# 5、启动项目访问 /JsonLogin.html 即可。
注意:
- 存储在数据库中的密码需要是密文,项目中使用的是
BCryptPasswordEncoder。- 准备数据库测试数据之前需要先将明文编码。
// 本项目 SecurityConfig 中注入了该组件
@Bean
public PasswordEncoder passwordEncoder() {
    return new BCryptPasswordEncoder();
}

// 在测试类中调用 passwordEncoder.encode("123") 方法就可以生成密文了。
3.2. 接口描述
接口地址:
(1)/smsCode:获取短信验证码。
| 接口参数 | 描述 |
|---|---|
| mobile | 手机号。必填。 |
| expireIn | 验证码过期时间(单位: 秒)。选填。默认60s。 |
| length | 验证码的位数(长度)。选填。默认6位。 |
注意:
项目中短信验证码并没有接入通信运营商,验证码信息会以 JSON 的形式返回,请注意查看 ~
(2)/imageCode:获取图片验证码。
例如:<img src="http://localhost:8081/imageCode?id=qwead" /> 即可获取验证码。
| 接口参数 | 描述 |
|---|---|
| id | 本次获取图片验证码的唯一标识。必填。 |
| expireIn | 同上。 |
| length | 同上。 |
(3)/doLogin:使用 username、password登录的地址。
详细信息请看 ImageAuthenticationFilter。
| 接口参数 | 描述 |
|---|---|
| username | 用户名。必填。如不填写,按空字符串匹配。 |
| password | 密码。必填。如不填写,按空字符串匹配。 |
| id | 本次获取图片验证码的唯一标识。必填。如不填写,按空字符串匹配。 |
| imageCode | 图片验证码。必填。如不填写,按空字符串匹配。 |
(4)/login/mobile:使用手机号登录的地址。
详细信息请看 SmsAuthenticationFilter。
| 接口参数 | 描述 |
|---|---|
| mobile | 手机号。必填。如不填写,按空字符串匹配。 |
| smsCode | 短信验证码。必填。如不填写,按空字符串匹配。 |
(5)/JsonLogin.html:H5页面,用于测试登录。也可以用 Postman 等工具测试。
(6)/logout:注销本次登录。
4. 更新记录
5月14日更新
5.14日更新:配置多个UserDetailsService?
先看原来的UserDetailsService实现类:
@Service
public class UserService implements UserDetailsService {

    @Resource
    private UserMapper userMapper;

    /**
     * 该方法在 {@link SmsAuthenticationProvider} 中被调用。
     */
    @Override
    public UserDetails loadUserByUsername(String username) throws UsernameNotFoundException {

        // 1: 先按照 username 查询, 用户名查不到再按照 mobile(手机号) 查
        QueryWrapper<User> wrapper = new QueryWrapper<>();
        wrapper.eq("mobile", username).or().eq("username", username);
        User user = userMapper.selectOne(wrapper);

        // 2: username和mobile都查不到直接抛出异常
        if (user == null) {
            throw new UsernameNotFoundException("用户不存在, 请先注册~");
        }

        // 4: 查到用户信息
        // 设置角色 user.setAuthorities(List<>) ....

        return user;
    }
}
UserDetailsService 是在 AuthenticationProvider 中被调用的,目的就是去查看用户是否存在。显然我们这里发的SQL是 select * from t_user where username = ? or mobile = ?。众所周知,SQL中使用 OR 会影响MySQL的性能,所以第一个解决办法是再写一个UserDetailsService。
UserService只用于查询用户名。UserMobileService只用户查询手机号。以上两个 UserDetailsService 更改业务逻辑非常简单,这里就不再展示了~
第一步:DaoAuthenticationProvider 调用 UserService 用于查询用户名是否存在。但是源码中并不知道我们定义了新的 UserDetailsService。
// DaoAuthenticationProvider 源码
public class DaoAuthenticationProvider extends AbstractUserDetailsAuthenticationProvider {
    // 这里定义的是接口
    private UserDetailsService userDetailsService;

    // ....
    // 以下方法中直接调用 userDetailsService.loadUserByUsername(String username)
}
因此,需要重新设置 DaoAuthenticaionProvider。配置如下:
// 项目中Spring Security的主配置类
@Configuration
public class SecurityConfig extends WebSecurityConfigurerAdapter {

    /**
     * 重新设置 DaoAuthenticationProvider
     *
     * DaoAuthenticationProvider 配置 UsernameNotFoundException 向上抛出。
     */
    @Bean
    public DaoAuthenticationProvider daoAuthenticationProvider() {
        DaoAuthenticationProvider provider = new DaoAuthenticationProvider();
        provider.setUserDetailsService(userService);
        provider.setHideUserNotFoundExceptions(false);
        provider.setPasswordEncoder(passwordEncoder());
        return provider;
    }

    /**
     * Spring Security 原生的 AuthenticationProvider 需要在这里配置才会生效!
     */
    @Override
    protected void configure(AuthenticationManagerBuilder auth) throws Exception {
        // 添加自定义的 AuthenticationProvider
        auth.authenticationProvider(daoAuthenticationProvider());
    }
}
第二步:我们自定义的 SmsAuthenticationProvider 也不知道 UserMobileService 的存在,也需要配置。
// 项目中短信验证码的配置类
@Configuration
public class SmsAuthenticationConfig extends SecurityConfigurerAdapter<DefaultSecurityFilterChain, HttpSecurity> {

    // 注入 UserMobileService
    @Resource
    private UserMobileService userMobileService;

    // 配置 AuthenticationProvider 需要有 UserDetailsService。
    @Bean
    public SmsAuthenticationProvider smsAuthenticationProvider() {
        SmsAuthenticationProvider provider = new SmsAuthenticationProvider();

        // 注意:这里添加的是 userMobileService
        provider.setUserDetailsService(userMobileService);
        return provider;
    }

    // 其他代码可以在项目中看到
    // 将 SmsAuthenticationProvider 加入到 Spring Security 中 省略
    // .....
}
OK大功告成,定义多个 UserDeatilsService 搞定 ~
但是,能不能就定义一个 UserDetailsService 就解决问题呢?
答案是肯定的,那就在 UserSevice 这个实现类中使用正则表达式即可~
项目本次更新用的也是该方法!
@Slf4j
@Service
public class UserService implements UserDetailsService {

    @Resource
    private UserMapper userMapper;

    /**
     * 该方法在 {@link SmsAuthenticationProvider} 中被调用。
     */
    @Override
    public UserDetails loadUserByUsername(String username) throws UsernameNotFoundException {

        QueryWrapper<User> wrapper = new QueryWrapper<>();

        if (ReUtil.isMatch(MOBILE_REGEX, username)) {
            // 参数 username 是手机号
            log.info("手机号登录...UserService");
            wrapper.eq("mobile", username);
        } else {
            // 参数 username 是用户账号
            log.info("用户名登录...UserService");
            wrapper.eq("username", username);
        }

        // 1: 手机号登录就去查手机号,用户名登录就去查用户名~ 只要能确定用户是否存在即可

        // 用户名 + 密码 登录模式 <==> username/mobile + password 模式
        // 即: 前端用户名的输出框, 既可以填 username 也可以填 mobile
        User user = userMapper.selectOne(wrapper);

        // 2: username和mobile都查不到直接抛出异常
        if (user == null) {
            throw new UsernameNotFoundException("用户不存在, 请先注册~");
        }

        // 4: 查到用户信息
        // 设置角色 user.setAuthorities(List<>) ....

        return user;
    }
}
5月16日更新
5月16日更新:remember-me功能。
Spring Security的记住我功能包含两方面:
- 登录校验成功后,token分别存储到数据库和浏览器的cookie中(RememberMeServices)。
- 再次登录,不用输入密码,需要进行校验(RememberMeAuthenticationFilter)。
第一步:如何登录?
// AbstractAuthenticationProcessingFilter 源码
public abstract class AbstractAuthenticationProcessingFilter {

    // 默认的RememberMeServices
    // 需要我们重新配置
    private RememberMeServices rememberMeServices = new NullRememberMeServices();


    // 用户名密码校验成功之后会调用这个方法
    protected void successfulAuthentication(HttpServletRequest request, HttpServletResponse response, FilterChain chain,
                                            Authentication authResult) throws IOException, ServletException {
        SecurityContextHolder.getContext().setAuthentication(authResult);
        if (this.logger.isDebugEnabled()) {
            this.logger.debug(LogMessage.format("Set SecurityContextHolder to %s", authResult));
        }

        // 登录时 remrember-me 的逻辑
        this.rememberMeServices.loginSuccess(request, response, authResult);

        if (this.eventPublisher != null) {
            this.eventPublisher.publishEvent(new InteractiveAuthenticationSuccessEvent(authResult, this.getClass()));
        }
        this.successHandler.onAuthenticationSuccess(request, response, authResult);
    }
}
由此可见,SmsAuthenticationFilter、ImageAuthenticationFilter 都需要设置 RememberMeServices。
详细配置请看 RememberMeConfig。
数据库表请看 persistent_logins.sql。
注意:
- 使用记住我登录功能,前端必须传remember-me参数。
- 由于remember-me参数的获取是直接从 request 中获取,所以post请求中的JSON要转换成表单登录的形式。
// AbstractRememberMeServices#rememberMeRequested(HttpServletRequest, String) 源码
String paramValue = request.getParameter(parameter);
if (paramValue != null) {
    if (paramValue.equalsIgnoreCase("true") || paramValue.equalsIgnoreCase("on")
        || paramValue.equalsIgnoreCase("yes") || paramValue.equals("1")) {
        return true;
    }
}
// 前端可以这样传数据。
postRequest('http://localhost:8081/login/mobile?' +
            'spring-security-remember-me=' + this.isRemember2, {
    'mobile': this.mobile,
    'smsCode': this.smsCode,
})
第二步:关闭浏览器再次登录的校验。
// RememberMeAuthenticationFilter 源码
public class RememberMeAuthenticationFilter {

    private RememberMeServices rememberMeServices;

    public void doFilter() {
        // RememberMeAuthenticationFilter 中需要使用我们自己的 RememberMeServices
        Authentication rememberMeAuth
            = this.rememberMeServices.autoLogin(request, response);
    }
}
配置如下:
// SecurityConfig 中的配置
@Override
protected void configure(HttpSecurity http) throws Exception {
    http
        // 开启 remember-me 功能
        .rememberMe()
        // 会在RememberMeAuthenticationFilter中加入rememberMeServices
        .rememberMeServices(rememberMeServices)
		...
}
第三步:数据库的过期登录信息需要自动删除,配置定时任务即可。
详细请看 RememberMeTask。
5. more ~
欢迎您对本项目提出宝贵的意见。如果本项目对您的学习有帮助,请收藏 ~
联系QQ:1466637477。


 4.5k Dec 30, 2022
 15.7k Dec 31, 2022
 19 Sep 23, 2022
 11 Apr 11, 2022
 7 Dec 20, 2022
 4 Sep 13, 2022
 1 Jan 26, 2022
 1 Jan 28, 2022