Dashjoin Open Source & Cloud Native Low Code Development Platform
![]()
For anyone who is planning a development project, faces a tight schedule, needs to present results quickly, or has limited development resources available. Dashjoin taps into and integrates your existing data sources and allows you to intuitively browse, search, edit, and visualize your integrated information. Add business logic to enable users and automation to act on the information. Unlike other Low Code Development Platforms, Dashjoin offers a free open source version with a commercial PaaS and bases on a unique, linked-data inspired approach to scalable data integration.
Live demo: https://demo.my.dashjoin.com/ (log in as guest, or with your registered user)
Webpage: https://dashjoin.com/
Blog: https://medium.com/@dashjoin
Video tutorials:
Features
- Universal DB Frontend: Connect to any SQL or NoSQL database, browse, search, and edit its contents. Extend the schema on the fly.
- Query Editor: Automatically collect schema information that powers an intuitive graphical query editor.
- Layout Designer: Graphically customize the layout for different types found in the database. Leverage the query editor to include meaningful charts.
- Data Integration and Federation: Visually map external data sources to your model. Load the data into a warehouse or federate the source into a virtual linked-data graph.
- Processes: Seamlessly start and integrate REST services from the application and monitor progress.
- Cloud Deployment: Deploy the apps in your private cloud or book our PaaS service. All apps scale horizontally and support state of the art cloud stacks.
- Everything JSON: Dashjoin leverages popular JSON standards like JSON Schema and JSONata and for all aspects of the system
- Open Source: Join the Dashjoin community and avoid vendor lock-in.
Table of Contents
- Getting Started: 15 Minute Tour
- Concepts
- Developer Reference
- Platform as a Service
- Installation
- Administration
- Development / Production
- Security
- Supported Databases
- API
- Contribute
Getting Started: 15 Minute Tour
This section guide you through the various features of the Dashjoin low code development platform. We assume you are in the admin role and have the demo application installed. This application bootstraps a sample northwind database which allows us to demonstrate advanced queries.
We will guide you through a scenario where northwind is an internal fictional enterprise resource planning (ERP) system. You a being tasked with developing an application that allows customers to interface with you via a web portal.
Database Management
To get to the data management page, click on the gear symbol in the toolbar. The table shows the databases that are available to the system so far. You should see the northwind database there.
Since northwind is a non-persistent in memory database, we will create a new database. This can be done with the create widget on the page. Select the following values and press "create":
type: SQLDatabase
name: sqlite
url:  jdbc:sqlite:your_database.db
From the database page, click on the sqlite database you just created. This brings you to the database details page. The connection information section allows you to make changes to the connection. Note that you can also simply click update in order to recollect the database metadata in case the schema was changed using another application.
If you are in the admin role, you can expand the database management section. Using the form, create a table called "REQUESTS". This operation creates the table with two columns: ID is the numeric primary key and name is a string column describing the record.
Go to the table by following the REQUESTS link in the database management table. On the page you can start entering some test data. Note that the SQL database enforces the uniqueness constraint on the ID column. If you try to create a record with an existing ID, you will get an error message: [SQLITE_CONSTRAINT] Abort due to constraint violation (UNIQUE constraint failed: REQUESTS.ID). By inspecting the created table, the system also automatically picks up the datatypes of the columns and requires you to provide an ID.
Open the column metadata control and add three more columns:
- submitted: date
- customer: string
- user: string
We can enter, edit and delete records via the user interface. Another option is to upload data. To do this, create a file called REQUESTS.csv (note that the file name must match the case sensitive table name):
ID,name,submitted,customer,user
1,Can you please send me an offer,2021-01-01 10:20,ALFKI,user
2,Delivery arrived,2021-01-01 10:20,ALFKI,user
3,Delivery delayed,2021-01-07 11:32,ALFKI,user
4,Are you out of crackers,2021-01-04 08:21,BLAUS,other
5,Need more crackers,2021-11-06 05:20,,admin
To upload this file, navigate back to the sqlite database page, expand the database management control and select "Upload Data". In the dialog, select "choose files" and select the file REQUESTS.csv you just created. This brings up a table with a preview (the first 10 rows) of the table. Since the requests table already exists, you cannot select a primary key or the column data type. These options are available if the target table does not yet exist in the database.
You have the choice of appending to or replacing the existing data. Choose "replace" in order to avoid further primary key clashes. Since we are permanently deleting existing data, we need to confirm this operation by entering "delete tables". Note that tables is plural since we can also upload multiple tables at once by selecting a Excel spreadsheet or multiple csv files.
Since our application should not change the northwind ERP database, we created the new table in a new database. Nevertheless, there is a logical connection between the two databases, since the customer field in the requests table references the CUSTOMERS table in the northwind database. Dashjoin allows you to express this relationship even tough it links columns and records in different databases.
Navigate to the REQUESTS table and open the column metadata control. In the table, select the customers column and click edit. In the popup, type "CUSTOMER_ID" in the foreign key reference field. The system suggests all known columns that contain this substring. Select "dj/northwind/CUSTOMERS/CUSTOMER_ID" and press ok. Since we made a change to the database metadata and the application caches this data, we need to clear the browser application cache by reloading the page.
After the reload, you will notice that the customer column in the table now shows a hyperlink to the related record in the customer table. Likewise, if you navigate onto a request or onto a customer, the related records are displayed even though they reside in a different database. In addition, if you start typing in the request creation's customer field, you will notice that the matching northwind customer IDs are showing up.
Navigate to the customer ALFKI (northwind/CUSTOMERS/ALFKI). The list of requests made by this customer shows up as a list of hyperlinks (1, 2, and 3). As a default, Dashjoin uses the primary key value as a link label, however we can customize this. Go to the REQUESTS table page, open the table metadata control and enter ${name} in the dj-label field. This string is a template syntax where constant strings can be mixed with template variables referencing columns. So a person template could be ${LAST_NAME}, ${FIRST_NAME}.
Save this change and reload the browser. The visit the first request. You will notice that the browser window title now displays the new label. Going back to the requests table you will see that any request that was visited, now shows a nice name. Likewise, if you go back to customer ALFKI, the list also shows the readable link labels (assuming they all have been visited).
Go back to the requests table and enter the letter 'a' in the customer field of the create form. You will see the autocomplete options with the customer IDs starting with 'a'. The customer IDs are five letter strings. This is better than a plain number, but let's also choose a display name for customers. Again, we can do this by navigating to the customer table (/table/northwind/CUSTOMERS), opening the table metadata control and entering the dj-label ${COMPANY_NAME}. Reload the browser and go back to the requests table. If you type 'a' into the customers create field, you will see the list of customer display names that start with 'a'. Note that the tooltip shows the underlying five letter primary key. This feature is very useful if tables use unreadable keys.
Restricting Access
Dashjoin makes it very easy to secure data based on user roles. To view the roles know to the system, go to the info page linked in the toolbar. The top left widget display the following information:
- The name of the current user (should be user name 'admin')
- The roles the current user is in (should be the user role 'admin')
- A link to the role management page
Follow the link to the roles page. On there, you can define new roles and define the home page for users in this role. In the system there are several places where you will be able to select the roles defined here. The role IDs you choose depend on the identity management system that is configured. In the Dashjoin PaaS, this is OpenID. If you are using the open source default installation, the roles are defined in the djroles.properties file:
admin: dj,admin
user: dj,authenticated
This file defines the users admin and user with roles admin and authenticated and both having the password dj. Therefore, the default system roles are admin and authenticated. If your identity management system defines other roles, you can define them on the roles management page in order to make them usable in the system. We will leave this unchanged for now.
In the next step, use a different browser or an incognito window and login user user with password dj. Except for the toolbar, the system looks pretty much the same. Navigate to the info page. You will need to type /page/Info into the browser, since the toolbar icon is not displayed. Verify that the page shows user in role authenticated. Click on "system roles" and "admin" and press delete. You will get the error message: "User does not have the role required to delete table dj-role in database config". The authenticated role has read access to the config database, but cannot create, delete or update any records.
By default, new databases are only accessible for the admin. We can demonstrate this by searching for the term "cracker". In the admin browser, you get a total of seven results from both the northwind and sqlite databases.
If you preform the same search in the user browser, you only get the five northwind results.
The northwind database grants read only access to the authenticated role. You can check this on the page /config/dj-database/dj%2Fnorthwind.
Now let's grant access to the sqlite database. Go to the page /config/dj-database/dj%2Fsqlite, select the authenticated role for both the read and write roles and save your change. Note that the admin role already has implicit access, therefore it is not listed in the options.
Go back to the user browser and repeat the search. Now you'll get the same result as in the admin window. You can also navigate to a request and make a change since write access has been granted.
User Layouts
This section explains how we can customize the layouts and how we can display different user interfaces depending on which role the user is in.
For our application, we'd like the users to have a page where they can see their past requests and where they can issue a new request. A request should only consist of the text. The fields ID, submitted and user should be determined by the system.
We start with the admin browser and navigate to the "dashboard pages" via the toolbar. Using the "Create a new page" control, create a new page called "Start". We will use this as the homepage for authenticated users. This can be setup on the authenticated role page (config/dj-role/authenticated). Enter "/page/Start" to specify the start page as the homepage for users in this role. We need to logout and back in using the user browser to pick up this setting. Clicking the home icon will now get you to the start page which at this point only shows a single tile with the text "New page".
In order to create this page, we need to use the admin browser. Before we add widgets to this page, we need to create a query that filters the user's requests and that projects the request columns in a suitable way.
This can be done using the query catalog and query editor. Navigate to the query catalog via the toolbar and in the create form, press the editor button. In the popup, select the sqlite database and the requests table. Using the dropdown, you can add the field user to the query. In the filter field, enter "user". Now we just need to hide the user column (select remove column from the column context menu) and drag & drop the name column to the first position. The query should be:
SELECT
  "REQUESTS"."name", "REQUESTS"."submitted"
FROM
  "REQUESTS"
WHERE
  REQUESTS.user = 'user'
Press OK to leave the query editor. Before creating the query, we need to add the ID (requests), type (read), and roles (admin, authenticated). The query needs one more argument, namely the current user. This can be specified by pressing the + symbol and adding the parameter user with type string and example "user". The example is used when editing a parameterized query in the editor. Finally, in the query text field, replace 'user' with ${user}. This indicates that the query has a dynamic parameter that is inserted into the query before it is run. Now save the query by pressing "create". At a later point, you can always go back and make changes to the query (e.g. add a join or another projection).
Now we navigate to the page start and enter the layout editor by pressing the pen symbol. We can now make changes to the page. Press the context menu under the text "New page" and select edit. This widget currently is a text widget displaying a static text. Instead we'd like a table showing our query result. Select the following:
widget: table
query: requests
database: sqlite
title: My Requests
arguments: {"user": $.user}
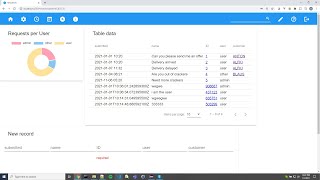
Press ok and the floppy disk symbol to save the new layout. You should now see a table with one row. Go to the user browser and reload the page. You should see three requests there.
We created a table widget that runs the requests query on the sqlite database. Now the requests query needs an argument called user. Dashjoin uses a JSON object to pass such parameters. Specifically, $.user reads the current username from the context. We will leave it at that, please refer to the developer guide for a full documentation of these expressions.
Now we are missing the functionality to submit new data. We can achieve this with the button widget. Enter the edit mode again and select add from the table widget's context menu. A new widget appears which we edit. Select the following values:
widget: button
text: Submit
title: New Requests
argument: name / string
This adds a form and a button to the page. There are three context menus, the top one for the widget, the middle one for the form, and the lower one for the name form element. Edit the last one and select these values:
widget: textarea
title: Your message
CSS styles: width / 400px, height / 200px
These settings change the default text field to a larger multi line text area. Finally, let's edit the button widget again to define what happens when the button is pressed. Enter the following expression in the field "run this when clicked and display the result":
$create(
  "sqlite",
  "REQUESTS",
  {
    "ID": $ceil($random()*1000000),
    "user": $.user,
    "name": $.form.name,
    "submitted": $now()
  }
)
Let's break down what is happening here. $create is a function which creates the record (3rd parameter) in the database (1st parameter) and the table (2nd parameter) specified. Database and table are static strings. The record consists of four dynamic fields:
The ID is computed by taking a random number (between 0 and 1), multiplying it with 1 million and rounding it up. Thus the ID is a random number between 1 and 1 million, providing reasonable protection from duplicate IDs.
The user is computed using the same construct ($.user) as for the table widget above.
The name is specified as $.form.name. The rationale is the following: The user entries are stored in a JSON object form which hangs under the context $. In this object, we choose the name specified as the button argument.
Finally, the submitted field is the current timestamp computed with $now().
After saving the layout, you can test the functionality. Note that you need to refresh the page after a value is submitted.
Admin Layout
The application administrator already has the ability to browse and search the data. However, it would be nice to add a chart to the system. To do this we first need to create another query.
Follow the steps as before and project the columns user and name. Next, select the column user and group by this column. The resulting query should be:
SELECT
  "REQUESTS"."user", COUNT("REQUESTS"."name")
FROM
  "REQUESTS"
GROUP BY
   "REQUESTS"."user"
Save the query under the name "requestsPerUser". Next, navigate to the REQUESTS table and enter the layout editor. Add a widget to the page and choose these settings:
widget: chart
title: Requests Per User
query: requestsPerUser
database: sqlite
chart: doughnut
Finally, let's assume we'd like a notification when a new request is submitted. We can do this by creating a trigger on the request table. Open the table metadata section and enter the following expression for the field "Trigger to call before a new record is created":
$echo($)
This trigger is a simple expression that calls the echo function. Echo takes an object which is written to the system console. In this case the entire context is written. Once you save and submit another request, you should see a line like this in the console:
{database=sqlite, search=null, command=create, table=REQUESTS, object={ID=762613, user=user, name=My test entry, submitted=2020-12-31T15:50:35.755459500Z}}
Instead of calling the echo function, we can of course send an email or perform any other kind of action.
Concepts
Before we dive into the user guide for the platform, this section explains a couple of key concepts.
Data Model
The Dashjoin low code platform sits on top of one or more databases. These databases can be empty, ready to store application data, or they can contain an existing schema and data, possibly under the control of other software and systems. Dashjoin connects to these databases and maps the data using for coordinates for each data record:
Record Coordinates
- Dashjoin: The first coordinate is the ID of the Dashjoin installation that accesses the database.
- Database: The unique name of the database containing the record.
- Table: The table name (unique within the database) of the table containing the record.
- Record key(s): The unique ID of the record within its table. This might be a list of keys if we are dealing with composite keys, for instance in a relational database.
These coordinates (DJ, DB, TABLE, PK) translate to RESTful URLs:
- Visualizing a record:
https://dashjoin.host.name/#/resource/DB/TABLE/PK - API access to the record:
https://dashjoin.host.name/rest/database/crud/DB/TABLE/PK
Tables and Columns
Dashjoin organizes data in tables and columns. Columns can be of simple types such as strings, integers, etc., but they can also be complex JSON documents. Therefore, Dashjoin is able to connect to multiple kinds of databases. Each of these drivers aligns the database specific nomenclature to the common data model. Therefore a document database's collections become tables, the documents become records and the document fields become columns.
Primary and Foreign Keys
Each table usually defines one or more primary key columns that uniquely define each record in the table. In addition, there can be foreign keys in a table that reference another table. This information is crucial for Dashjoin, since it is used to automatically display hyperlinks between records.
Usually the key information is extracted from the databases by the drivers. However, some databases do not allow for expressing foreign key information. In this case, the information can be added to the Dashjoin metadata by the user. This mechanism even allows setting foreign key relationships between databases and even from one Dashjoin system to another. This does not enable you to run a federated query like you would within a single SQL database. However, Dashjoin uses this metadata to hyperlink records between databases and logical Dashjoin installations.
Table and Instance Layout and Navigation
The Dashjoin user interface concept is inspired by the Semantic MediaWiki. The database is thought of as a large linked data cloud. Dashjoin user interface pages can be one of the following types:
- Record page: Assume the user navigates to the page /resource/DB/TABLE/PK. The system displays a page that corresponds to this record.
- Table page: Assume the user navigates to the page /table/DB/TABLE. The system displays a page that corresponds to this concept / table.
- Dashboard page: Assume the user navigates to the page /page/Page. The system displays this page which has no direct related context in the database.
Unless the low code developer specifies otherwise, table and record pages are displayed as follows:
Default Table Layout
Table pages show
- a pageable and sortable data table
- a form to create a new record
- if you are in the admin role, controls to edit the table schema and metadata
Within the data table, any primary or foreign key field links to the corresponding record page,
Default Record Layout
Record pages show
- a form to edit the record
- a delete button
- a link back to the table page
- links to any related record (this can either a foreign key field of the record or records in other tables containing foreign key references to this record's primary key)
The default layout allows the user to easily navigate the data regardless of which specific database it is located in.
Widgets and Custom Layouts
For each table, the default table and instance layout can be adapted. A layout is a hierarchy of widgets. Widgets that contain other widgets are called containers. Every widget has a couple of properties. The chart widget for example, defines which query to visualize.
Schema Metadata
We already mentioned that a developer can define foreign key relationships, even if the underlying database does not support this concept. Dashjoin allows a number of information to be entered about databases, tables, and columns. This data is usually called metadata. Dashjoin stores this metadata in the built-in configuration database, but this database behaves just like any other database. Therefore, each database and table are records and their pages behave just like any other page in the system.
Interacting with the System
So far, we mostly looked at the way Dashjoin organizes and especially how it visualizes information. This section describes how an application interacts and changes the underlying systems in other ways.
Create, Read, Update, Delete (CRUD)
A database driver usually exposes CRUD operations to the platform. These operations are used to display data but also to make changes from the forms displayed in the default layout. Note that, unless configured otherwise, the form shows an edit element for all columns.
Running Queries
Besides simple read and browse operations, the underlying databases usually have the ability to run powerful queries. Dashjoin allows the developer to design such queries and save them in the query catalog consumption. These queries usually drive table and chart displays on customized layout pages and dashboards. Note that queries can also be used to run delete or update operations nd that they can also be parameterized.
Executing Functions
Apart from changing data in databases, Dashjoin can call functions on the backend. You can think of a function as a small pre-built and configurable service. Examples for function types are sending email or making a REST call. These can be instantiated in a system as "sendGmail" and "getStockPrice" by using the function type and providing the required configuration. These functions can then be used by active page elements such as buttons.
Evaluating Expressions
Expressions are small programs that can be used to configure widgets on a page. The display widget for instance can display texts on the UI. The text to display is computed by an expression. This expression can for instance call the stock market function on the backend, and do some additional JSON transformation on the results before displaying the data.
You can think of the expressions being the glue between widgets on the top and queries, CRUD and functions on the backend:
| Widget | ||
| Expression | ||
| CRUD | Function | Query |
Developer Reference
This section explains all Dashjoin features in more detail and serves as a reference guide.
Universal Database Frontend
Dashjoin offers an intuitive default visualization for any kind of data. It features the following building blocks:
Default Visualization of Tables
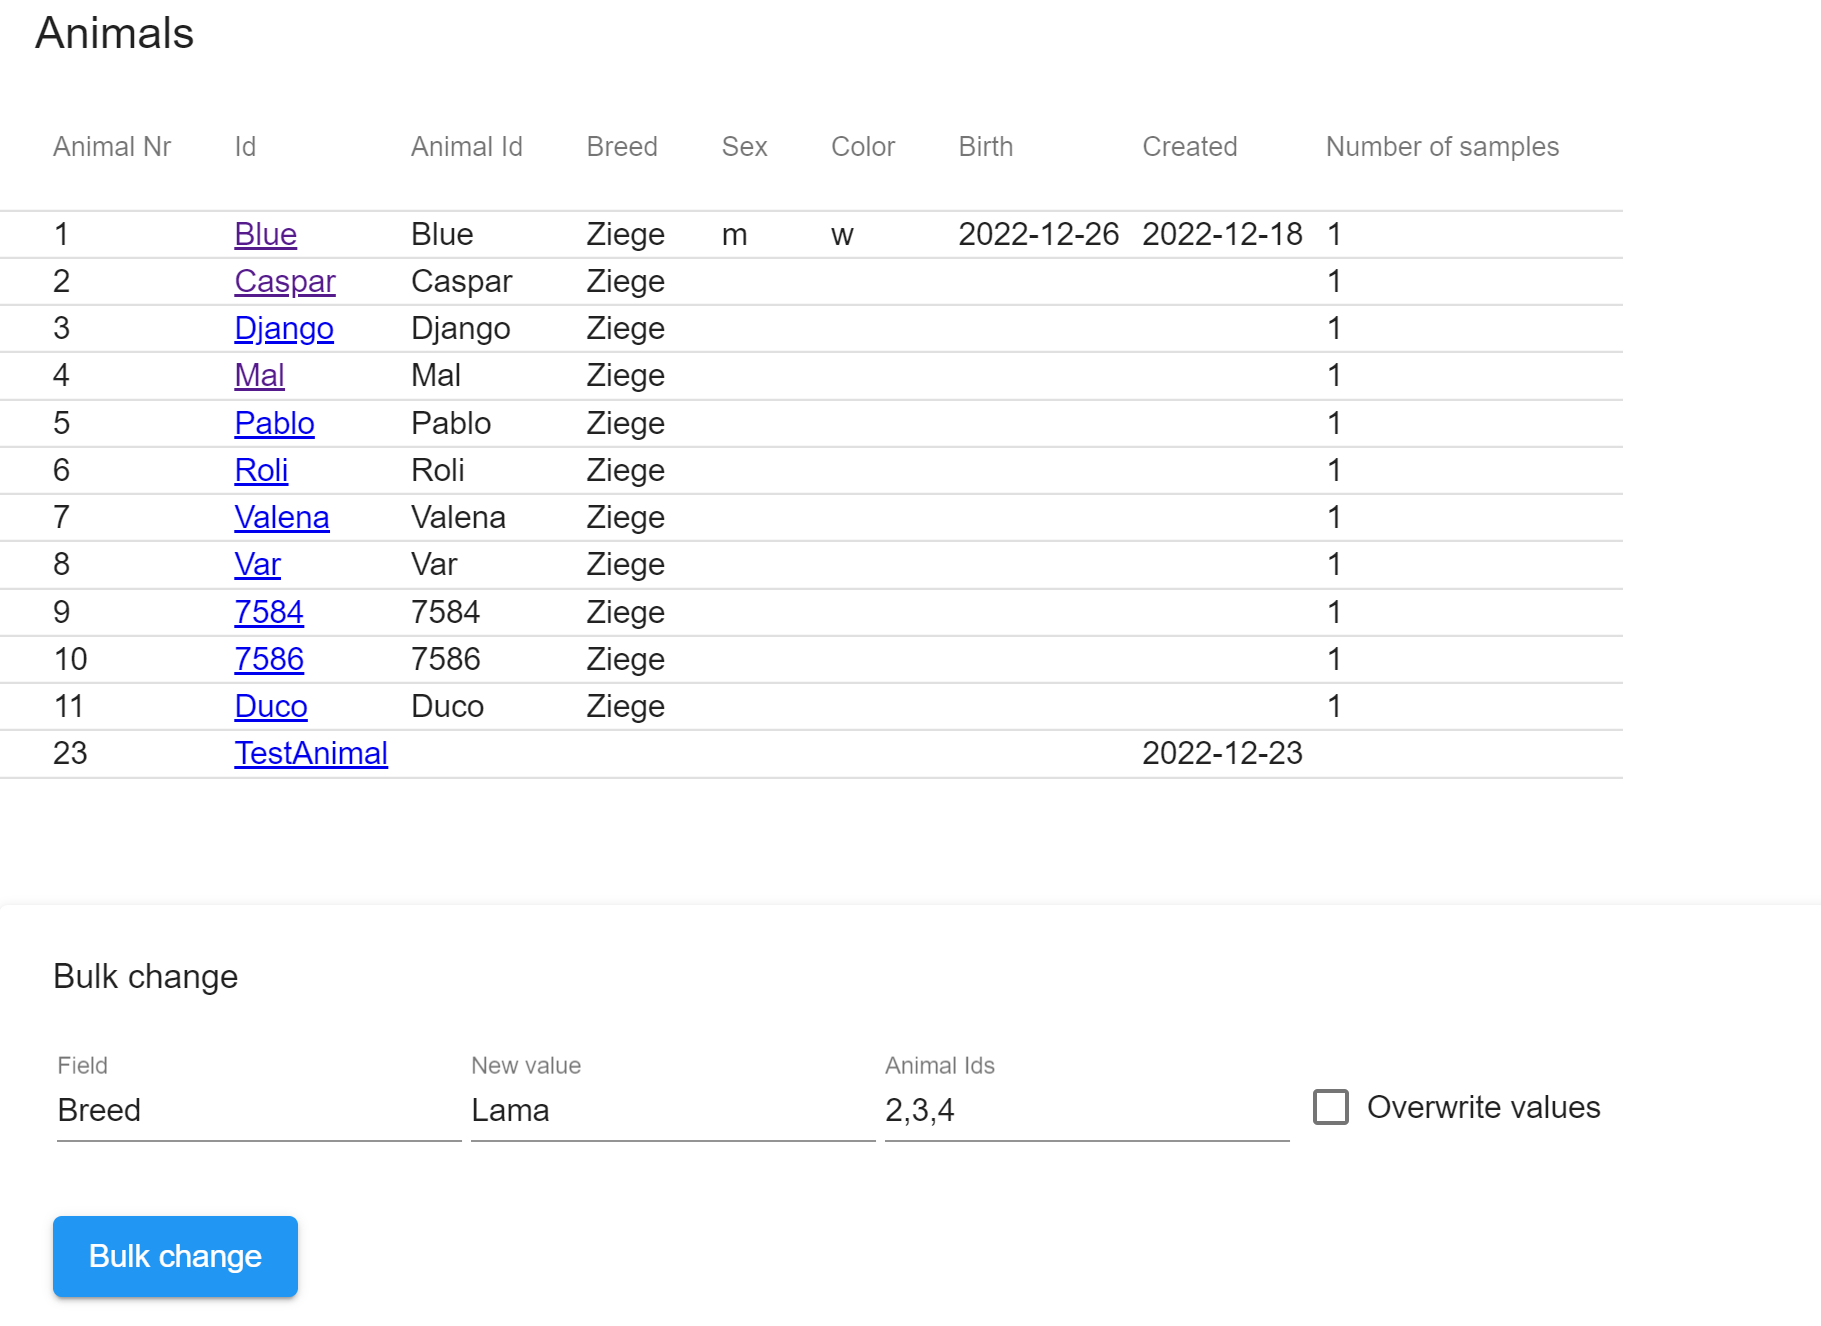
Unless specified otherwise using the layout editor, all table pages show two elements. First, we have a sortable and pageable table showing the database table contents. Any primary or foreign key displays a link to the corresponding record page. Secord, the page shows a form for creating a new table record. The form is configured using the table metadata the system collected from the database. In case you are a system administrator, you will see two more widgets which are explained in the section on data definition operations below.
Default Visualization of Records
The record page also has two elements. First, there is a form allowing to update and delete the record. The form is almost identical to the create form on the table page. The only exception is that it is not allowed to change primary key columns. If you would like to do this, you need to delete and re-create the record using the new key. Second, the page has a widget showing links to the table page and all related records. Note that records are related if a key in the record points to another record or vice versa.
Search Page
Dashjoin offers a powerful search capability of the underlying databases. When you enter a search term in the toolbar, the search is federated to all registered databases and the result page shows the combined result using the following columns:
- a link to the actual record matching the search
- the name of the table the record is located in
- the name of the column that matched the search
- the matching column value
TODO: define the exact search semantics (lower / upper case, startswith, contains, etc.)
Data and Database Management
In Dashjoin, it is possible to register multiple databases. This section lists the supported management operations for these databases.
Database Dashboard
The database dashboard shows the databases known to the system and allows registering new databases. The table displays some core information about each database, the connection status as well as the number of tables detected. To register a new database, first select the database type. Depending on your choice, the respective connection options appear. Once you connect, Dashjoin will collect the database metadata and immediately make the new database ready for searches, queries, and browsing. The table also provides a link to the individual database. Use this page to change connection parameters. You can also simply press update to recollect the metadata. This is useful if the underlying schema was changed by another application. Deleting the database disconnects from the database and deletes the connection information. No data is deleted in the database. The page also contains a link to the system's configuration database. Every role defined in the system must have read-only access to the configuration database. You can use this page to grant that access. In the PaaS version, you can also use the upload functionality to bulk-register tenant users.
You can also specify the roles that are allowed to read and write to the database. Note that by default, the admin role has access to all tables. Finally, you can specify search queries for a database. Please see the performance tuning section below.
Data Definition Operations
The database page also offer a database management section. You can create a new table there. The new table will contain two columns:
- ID: a numeric primary key
- name: a generic string describing the record
The display table shows all database tables. You can delete tables there. Attention: this is a permanent operation that you have to confirm by typing "delete" into the dialog. Editing a table offers several options which are explained in the following sections. You can change the table name. This change is performed on the underlying database (e.g. a rename table operation on an SQL database).
Following the link to an individual table offers two sections in addition to the normal table display. The table metadata section simply makes the table operations (e.g. renaming a table) available from this page also. The column metadata allows creating, renaming, and deleting columns. Attention: deleting columns is a permanent operation and needs to be confirmed by typing "delete" in the dialog. Besides renaming columns, other options are available which are explained in the below.
Upload
The database management section also allows to upload data from multiple files to the current database. The following file extensions are supported:
| File | Extension | Table Name | Column Name | Suggested Data Type | Suggested Primary Key |
|---|---|---|---|---|---|
| Comma separated UFT-8 format as defined by RFC 4180 | .csv | File name before extension | First row | Guess by inspecting the data | First unique column |
| Microsoft Excel | .xlsx | Sheet name | First row | Guess by inspecting the data | First unique column |
| SQLite database | .sqlite | From database | From database | From database | First unique column |
| JSON table | .json | File name before extension | First row | Guess by inspecting the data | First unique column |
| Model folder upload to config DB | - | - | - | - | - |
The system allows you to choose multiple files and collects all tables and columns from them and displays a preview of all tables in tabs. The table above shows how the system determines table and column names as well as the primary key and column types. You cannot change the table and column names in this display. If you would like to change them, abort the process, change the source file, and repeat the upload process.
Depending on the tables to be uploaded, there are two modes. If one of the tables exists already, we enter the append / replace mode. This mode requires the structure of all tables to match the existing tables. You cannot pick column types or primary keys in this mode. You can then decide to append the data to the existing data or to replace the existing data. Attention, replacing the data will delete the data currently stored in these tables permanently. You therefore have to confirm this operation by entering "delete contents".
If none of the tables exist, we enter the create mode. The preview does allow changing the primary key and column types. The suggested values are guesses based on the data and must be double checked by the user.
Column Operations
The operations on columns can be grouped into two categories. First, changing the name and / or datatype results in the underlying database to be changed (i.e. using an alter column command on SQL databases).
Second, editing primary and foreign keys are changes on the metadata level only, since not all databases support these concepts. You can specify a column to be the primary key of the table. Note that the user interface does not support composite primary keys. A column can also be defined to be a foreign key by entering the corresponding linked primary key. Note that it is possible to define references not only within the same database but also to other databases. Setting foreign key references causes the foreign key column to display links to the related record and vice versa.
Table Label
Besides changing the table name, you can enter a label and triggers. The label defines how the system should display a record in the following scenarios:
- the browser page title when we are on a record of that table
- in the autocomplete dropdown when editing a foreign key field
- when displaying the label of a hyperlink pointing to the record
This feature is important when a table uses an artificial or non-descriptive primary key like a number or a UUID. By default, the system uses the key in the scenarios above, leading to unreadable and unintuitive displays. In this situation, the label can be changed to a template string with the template variable referencing other more descriptive record columns. For instance the table PERSON could define a label "${LAST_NAME}" or even "${LAST_NAME}, ${FIRST_NAME}" in order to display meaningful and user readable information rather than numbers or UUIDs.
Note that the user interface loads these template values in a lazy fashion whenever you visit a record page.
Table Triggers
Dashjoin offers create, update, and delete operations for each table. A trigger can be installed on each table that reacts before or after these operations, resulting is six trigger configurations. A trigger is an expression that is evaluated in the respective case. This following context is passed to the expression:
- command: one of create, update, or delete
- database: the database being modified
- table: the table being modified
- search: a map with the record's primary keys
- object: the record to the created or the fields to be updated
Please see the section on expressions for more details.
Query Catalog and Editor
The query catalog allows you to save queries that are used by other parts of the application. Usually, these are chart and table widgets that display query results. The catalog allows you to manage queries in a central place, reuse them across the application and define important metadata about parameters and access control.
Query Catalog Page
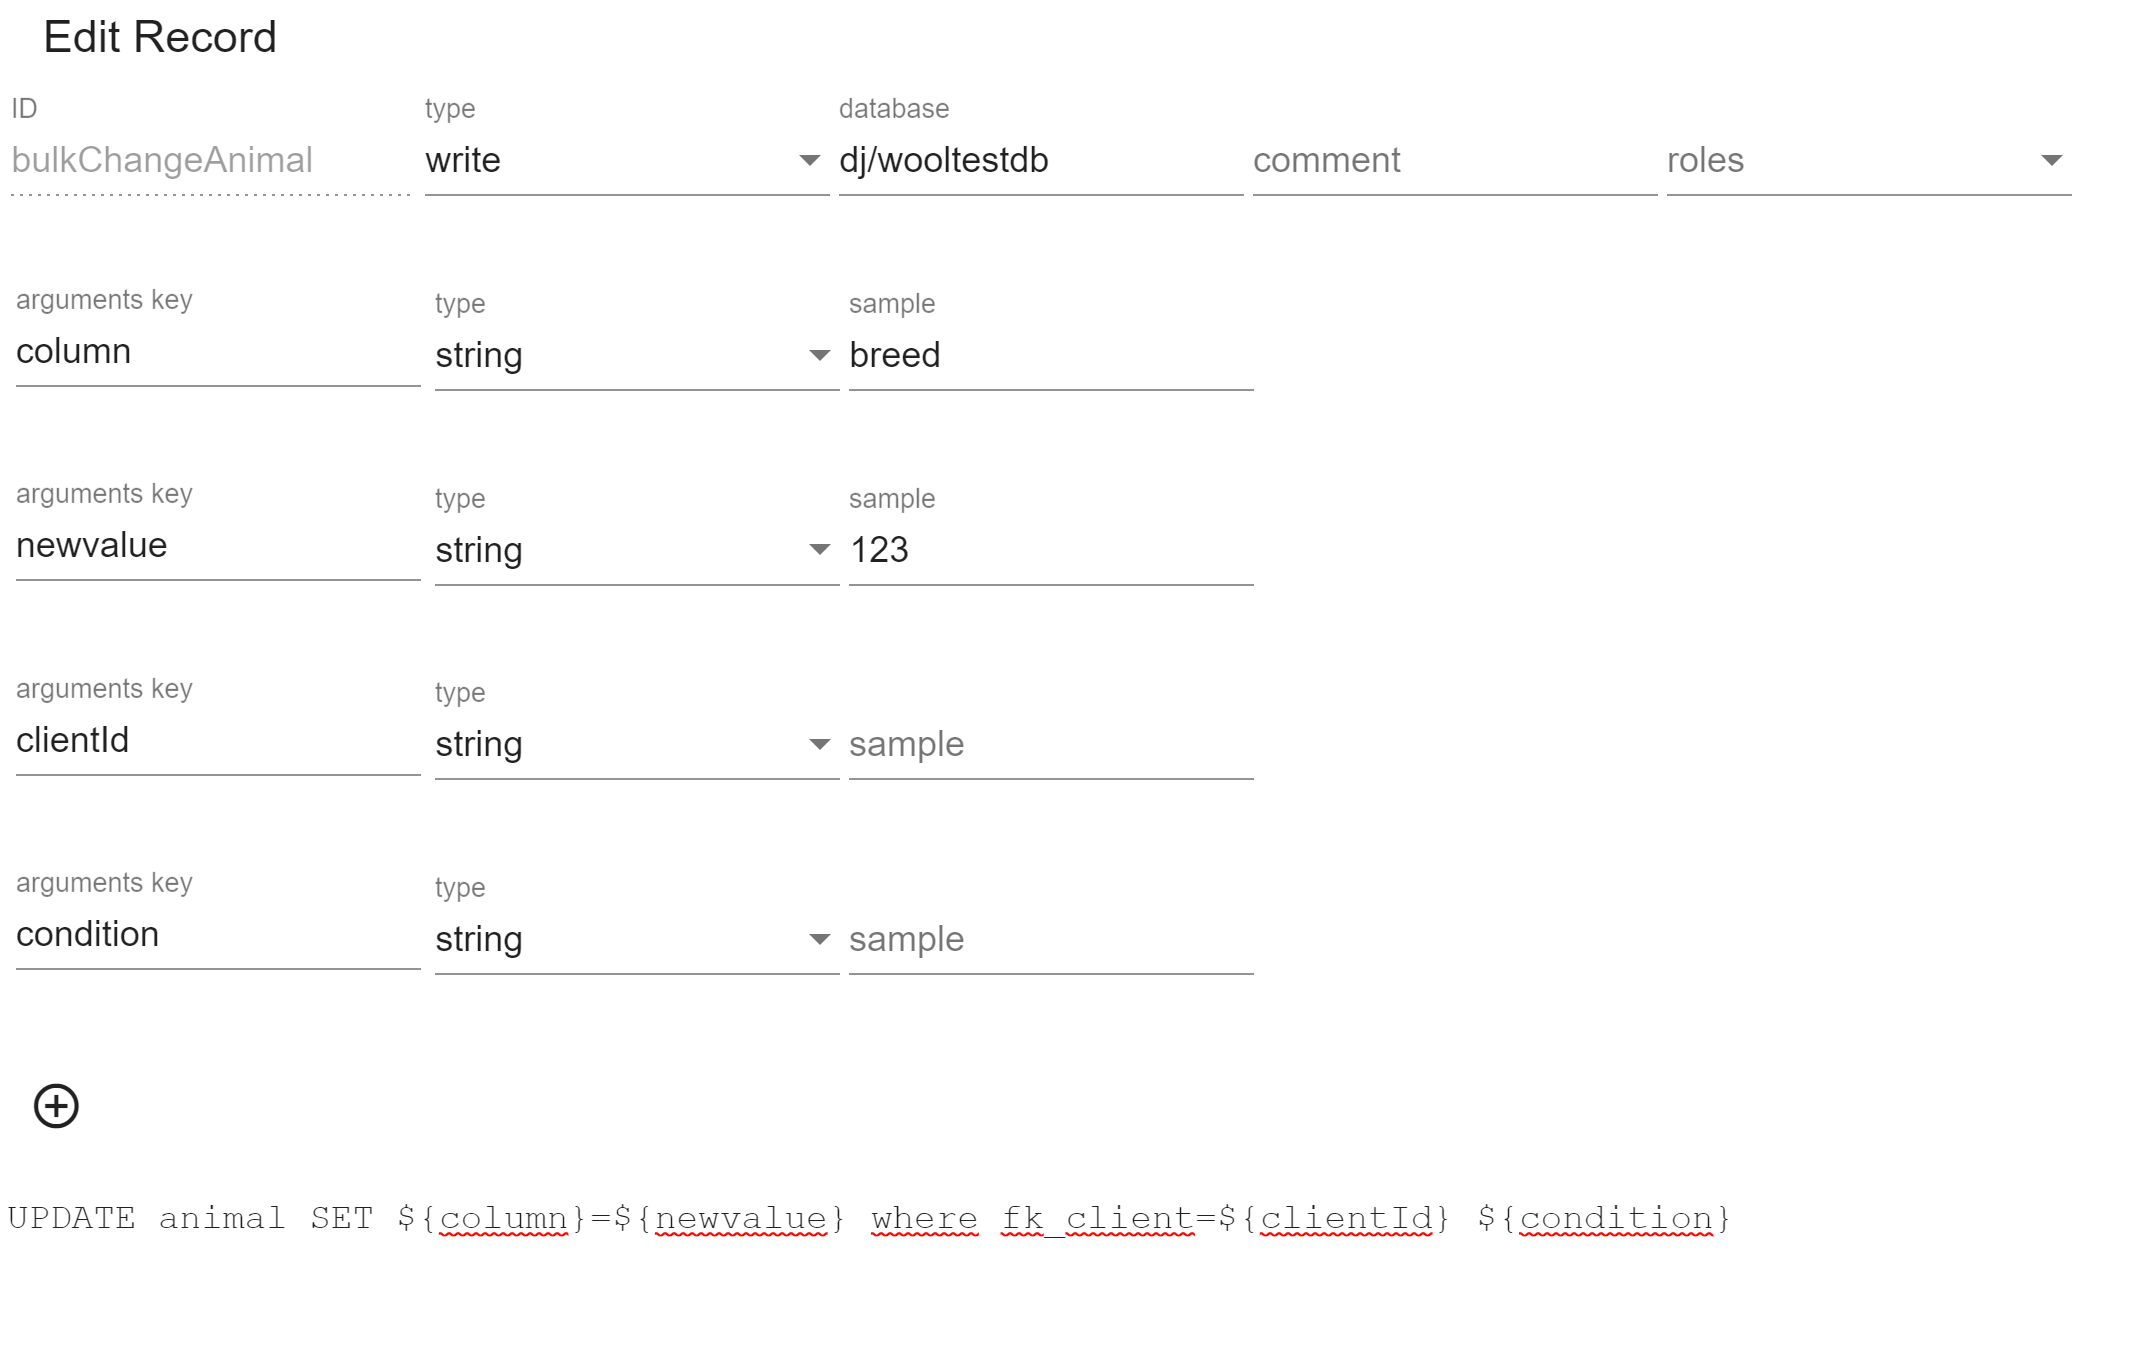
The query catalog page show a list of all defined queries as well as a form for entering a new query. The form has the following fields:
- ID: this is a unique identifier to reference the query (e.g. from a chart widget)
- type: queries can have type read and write indicating whether the running the query will make changes to the underlying database
- roles: defines which roles are allowed to run the query
- database: this field can only be written from the editor as shown below and defines which database is used in the query editor (note that the application can later run a query on other database with the same schema)
- arguments: queries can be parameterized using arguments (see the section below for more details)
- query: allows making manual edits to the query and offers to open the query editor dialog

Features
- Graphically build queries in an Excel-like fashion
- Add columns and join tables via point and click
- Reorder columns using drag & drop
- Apply where filters by simply adding them to the query result table
- Aggregate / group results right in the data table
- Rename columns
- Manual query edits are possible as well
- Download results as CSV
Supported Query Constructs
The editor supports a wide range of features of the query language, namely any kind of table join, aggregation and filter. It is possible to add advanced constructs such as a subquery to the query by making changes in the lower text field. In this case, the query editor displays the query result but no longer allows making changes to the query via the UI controls. The reason for the controls being disabled is shown in a tool tip. You can return to the last supported query via the undo button.
Result Size
During the process of writing the query, we limit the results to 1000 rows. Use the limit text field to set an explicit query limit. Once, the limit is set, it overrides the default of 1000 result rows.
Query Parameters
The query catalog page allows defining query parameters. Each parameter consists of the following information:
- key: this is the parameter name that allows the query to reference the parameter using ${key}
- type: defines the datatype of the parameter
- sample: this is the value that will be used in the query editor
Consider the following example that searches for persons with a certain name older than a given age:
select * from PERSON where NAME=${p_name} and AGE>${p_age}
This query has the string parameter p_name and the integer parameter p_age. In order to edit the query and display a result preview, we need to pluck in sample data. So we can define the samples:
p_name: Mike
p_age: 20
This results in the following query that is used when editing the query. So in the edit dialog, the following query is used (note that the system automatically handles quotation of strings and dates):
select * from PERSON where NAME='Mike' and AGE>20
Once the editor is closed, the samples are replaced with the template variables again. Note that this replacement is string based, so you should choose parameter names that do not "collide" with other parts of the query. Hence, we choose the prefix p_.
User Interface Layout
While Dashjoin has a rich default page layout that is suitable for many use cases, every aspects of the display can be configured using the functionality described in this section.
Pages Dashboard
The pages dashboard provides you with an overview of the available pages in the system. The first table shows the dashboards available in the system. This is a mix of system pages, which are explained in more detail in the next section, and pages created by the user via the "create a new page" form.
The page contains a link to widgets, which are introduced further down. Finally, the layouts table provides an overview of all tables and whether the default layout is used or whether the user has customized the layout using the layout editor.
System Pages and Layouts
The system comes with two system pages (Home and Info) and some layouts for databases, tables, queries, etc. These layouts contain much of the functionality described in this reference guide.
System pages can be changed using the editor introduced below, however, a delete operation does not delete them altogether, but rather resets them to the "factory" state. This ensures that you cannot accidentally damage a system permanently using the editor.
Layout Editor
To activate the layout and form editor, press the pen symbol in the toolbar. You will remain on the page, but several controls will pop up on the screen.
All widgets show a context menu with the following options:
- The top line and tooltip tell you which part of the user interface you are editing. The options are:
- Page "pagename": You are editing a dashboard page such as /page/Home
- "tablename" table: You are editing a table layout such as /table/config/dj-database
- "tablename" record: You are editing a table's record layout such as /resource/config/dj-database/dj%2Fnorthwind
- default record / table: this is the default layout (note that the default table cannot be modified and any attempted change will display an error message)
- Edit: opens a dialog to edit the widget
- You can change the widget type using the dropdown element on the top of the form
- Depending on your choice, different fields show up allowing you to configure the widget
- Please refer to the widget reference section below for a complete documentation of the various options
- Add: adds a new widget to the container or next to the widget
- Delete: removes the widget (not available on the page root)
- Cut: like delete but remembers the widget for paste operations
- Copy: Remembers the widget for paste operations
- Paste: Like add but uses the cut or copied widget
- Top: moves the widget to the top or left of the container depending on the layout
- Up: moves the widget one position up or left depending on the layout
- Down: moves the widget one position down or right depending on the layout
- Bottom: moves the widget to the bottom or right of the container depending on the layout
- The last entry is one of the following:
- Delete page: deletes a dashboard page
- Customize: if you are on a default table or record, creates a customized version of the page for this table
- Delete custom layout: if you are on a custom table or record layout, goes back to the default layout for this table
The top of the page shows a number of layout options that can be chose for the page. The options are explained in the widget reference section below. Note that the layout is responsive and will switch to a one column layout for mobile devices.
Any changes to the layout or kept in the browser memory only. You can reload the page if you would like to abandon any changes and leave the edit mode. Your changes are saved once you click the save symbol in the toolbar.
Form Editor
The button, create, and edit widgets display a nested form. Unless specified otherwise, the form elements are initialized from the table metadata. Each element display another context menu with the following options:
- Edit: opens a dialog to edit the form element giving you the following choices
- Form widget: allows you to pick the input control such as a date picker or a password field
- Title: the title of the form element (defaults to the column name)
- Description / tooltip: an optional longer description
- Example data: shows valid example input once the user clicks in the element
- Read only: disables fields that should be shown not not changed
- Format: contains pre-defined input formats for email addresses, websites, etc.
- Validation error message: the error message to show if the user enters illegal values
- Input choices: allows you to specify predefined input options
- CSS classes and CSS styles: allows you to change the default styling of the component. You can attach CSS classes used in the material design (e.g. mat-elevation-z8) or use CSS style attributes directly (e.g. width: 400px or color: green).
- Show: allows to re-add form elements that were previously hidden
- Show inline: like show, but forms a subgroup of elements (for instance address form fields can be grouped together)
- Hide: hides a form element
- Up / Left: moves the form element up or left depending on the layout
- Down / Right: moves the form element down or right depending on the layout
Custom Widgets
The system ships with a number of built-in widget such as charts or buttons. When building an application, you might find it useful to create reusable layouts. These are called custom widgets. To create a widget, navigate to the pages dashboard and follow the link to widgets.
Let's do a walkthrough of a small example. Create a widget called "tooltip-icon", navigate to the widget's page, and enter the edit mode. On the "Widget preview" element, open the second context menu with the tooltip Widget "tooltip-icon" in order to define the widget. In the editor, select the widget "icon", remove the element text and enter "reusable" in the tooltip, and save the layout. You now created a custom widget called tooltip-icon that carries a reusable configuration.
Next, you need to do a browser reload, since the editor caches custom widgets and needs to pick up the new widget. Navigate to the home page and add two widgets. Edit both widgets, select "tooltip-icon" as the widget type, and use icon home and search respectively. Note that the different icons show up, but both show the tooltip "reusable". The layout editor also shows two context menus. The left menu with tooltip "Page Home" edits how the the tooltip-icon widget is embedded. The right menu with tooltip "Widget tooltip-icon" edits the widget itself. If you open the editor there and select a different tooltip, the next value is applied to both home and search.
Obviously this example is very simplistic, however it demonstrates how you can create reusable sub layouts. Note that the custom widget can also be a container with nested widgets. You can test this by changing the tooltip-icon widget to "expansion" for instance.
dj-toolbar
The system ship with two predefined widgets. The widget dj-toolbar is included by default by the page widget. You can edit the toolbar by visiting the page /resource/config/widget/dj-toolbar. Once you enter the edit mode, you can make changes to the toolbar. A typical use case would be to edit the roles that are required for an icon to appear. You can also add an icon pointing to your custom dashboard page. Since the dj-toolbar is shipped with the system, you can revert back to the original version by clicking delete on this page. Do not forget to reload the browser since the widgets are cached.
Widget Reference
The following sections describe the platform widgets and which configuration options are available for them. Note that all widgets have the title option:
- title: when the widget is a direct child of the page container, the widget is placed in a card with this title
Widgets can be grouped into the following three categories.
Container Widgets
Container widgets can contain other widgets.
card
Layout card with a title and nested widgets:
- text: card title
- roles: show container only if user is in one of these roles
- layout: chooses a horizontal (default) or vertical layout for the child widgets
- if: show the widget if the expression is true
- foreach: show the single child for each result, using the result as the context
- class: CSS classes to apply to the container
- style: CSS styles to apply to the container
container
Container with a plain layout
- roles: show container only if user is in one of these roles
- layout: chooses a horizontal (default) or vertical layout for the child widgets
- if: show the widget if the expression is true
- foreach: show the single child for each result, using the result as the context
- class: CSS classes to apply to the container
- style: CSS styles to apply to the container
expansion
Collapsible container with nested widgets
- text: card title
- roles: show container only if user is in one of these roles
- layout: chooses a horizontal (default) or vertical layout for the child widgets
- if: show the widget if the expression is true
- foreach: show the single child for each result, using the result as the context
- class: CSS classes to apply to the container
- style: CSS styles to apply to the container
grid
Container with a grid layout
- roles: show container only if user is in one of these roles
- if: show the widget if the expression is true
- foreach: show the single child for each result, using the result as the context
Regular Widgets
All non-container widgets are called regular widgets.
all
Shows all instances of a table. This widget can only be used on table pages and has no other configuration options.
button
Runs / evaluates an expression when clicked.
- text: text shown for the run button (default is "Run")
- onClick: expression to evaluate when clicked
- properties: optional properties the user needs to enter before clicking
chart
Chart for visualizing query results.
- database: database to run the query on
- query: query to run
- arguments: optional expression resulting in query arguments
- chart: chart type
create
Creates new database records:
- text: text shown for the create button (default is "Create")
- database: optional database to create the record in (defaults to the database of the table you are currently displaying)
- table: optional table to create the record in (defaults to the table you are currently displaying)
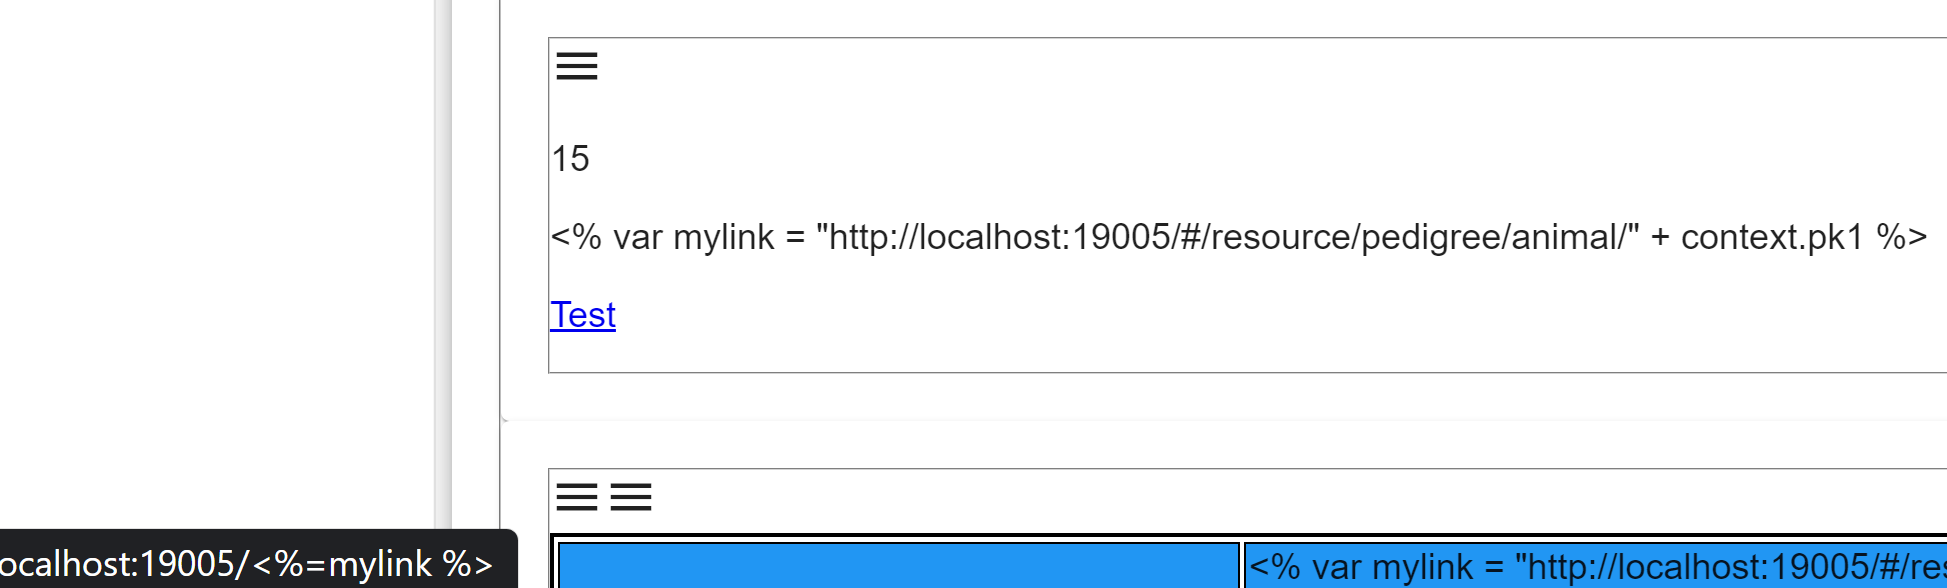
display
Displays the result of an expression:
- display: expression to display
Depending on the result of the evaluation, one of the following four cases applies:
- a single result value is displayed as is
- an object is displayed as a key-value list
- if the object has exactly the keys "database", "table", and "pk1", the result is displayed as a link to the record identified by these values
- if the object has exactly the keys "database", "table", "pk1", and "page", the result is displayed as a link to the record identified by these values and uses the specified page to visualize the record
- an array of objects is displayed as a table
edit
allows editing a database record
- deleteConfirmation: optional confirmation message before deleting the record
editRelated
Allows editing related records of a database record:
- text: text shown for the create button (default is "Create")
- prop: foreign key column on the related table
- columns: columns to display in the editRelated table display
- deleteConfirmation: optional confirmation message before deleting a related record
icon
Displays a hyperlink icon with tooltip
- href: optional link target
- icon: icon to display (see https://material.io/resources/icons/?style=baseline)
- tooltip: icon tooltip
links
Displays links to related records
markdown
Displays markdown
- markdown: markdown to display
- context: an expression that allows setting additional context variables that can be referenced via ${context.VARIABLE}
table
Displays query results as a table
- database: database to run the query on
- query: query to run
- arguments: optional expression resulting in query arguments
text
Displays a simple text
- href: optional link target
- text: text to display
- icon: optional icon to display in front of the text
tree
Displays a tree based on a recursive query
- database: database to run the query on
- query: query that projects a single column with the keys of the current node's children
- arguments: expression that passes the current node's primary key as a query argument
variable
Displays a form that allows setting session variables. If a variable "x" is defined and set, it can be referenced in other widgets using "variable.x".
- properties: an object where the fields are variable names and the values the respective types
Special Widgets
The platform defines a couple of special widgets that are not offered in the layout editor.
page
The page container is a special container which usually is placed at the page's layout root. Compared to a regular container, it has the following additional layout features:
- it always shows the dj-toolbar widget
- all of its children are displayed in cards with the widget's title field used as the card title (the title is ignored if the widget is placed elsewhere)
The page defines a single option called pageLayout. It has the following value range that defines how the page's children are arranged:
- 1 column: single column layout
- 2 column: a two column layout
- 3 column: a three column layout
- T 2 column: the first widget is placed at the top with full width, followed by the other children in a two column layout
- T 3 column: the first widget is placed at the top with full width, followed by the other children in a three column layout
- horizontal: all children are arranged left to right, possibly wrapping into the next row
- grid: all children are arranged on a table grid
toolbar
(container with child widgets in a toolbar layout)| show container only if user is in one of these roles
activity-status
Progress bar that indicates whether the UI is loading data.
layout-edit-switch
Toggles layout edit mode and allows saving layouts.
queryeditor
The query editor widget:
- database: optional database preselection
- query: optional query preselection
search
Text box for entering global search terms
search-result
Table display for search results.
spacer
Spacer between left and right aligned container items.
upload
Button that uploads data to a database.
Functions
Apart from changing data in databases, Dashjoin can call functions on the backend. Functions come in two flavors: First, there are functions that simply extend the functionality you can use in expressions. An example would be a simple toUpperCase function that transforms a string to upper case. These functions are introduced further later in the section on expressions. Second, there are configurable functions. These work very much like their counterpart, however, they require additional configuration parameters. An example would be a function to send an email. The actual function call requires you to specify subject, sender, receiver, and the body. But you would not want to have to repeat the email server address and credentials every time. So you can register an instance of email service with specific parameters and call it email-service-1. This section describes the latter configurable functions.
Function Page
The function page works a lot like the database page. It shows a table of the functions that have been created on the system. To create a new function, you first need to select the function type. Depending on your choice, you can enter the respective configuration parameters. The function type specifies whether the function is read only or whether it has side effects like sending email or writing data. Finally, the roles specify which user role is allowed to run the function.
Function Reference
The system supports the following functions. Each section lists the function configuration parameters that are constant any time this function is called as well as the parameters that are specific for each invocation.
RestJson
Calls an external REST service.
Configuration
- url: the URL of the REST service to call
- username: optional HTTP basic authentication user name
- password: optional HTTP basic authentication password
Invocation parameter
- object: If object is specified, POSTs the object serialized as JSON. If object is null, GETs the result
Return value
- JSON result returned by the service
Sends an email.
Configuration
- username: username to log into the email service
- password: password to log into the email service
- properties: SMTP server configuration
Invocation parameter
- from: email sender in RFC822 syntax
- to: email recipient in RFC822 syntax
- subject: email subject line
- text: email text
Return value
- none
Invoke
Allows saving an expression on the server. When run, we evaluate / apply the expression with the data context passed as an argument.
Configuration
- expression: The expression to save and run when invoked
Invocation parameter
- object: the expression evaluation context (see next chapter)
Return value
- expression result
Mapping Functions
Mapping functions are specialized functions that have no invocation parameters and outputs. They are used to write data into a database and can be run in a scheduled fashion. All mapping functions perform the following three steps:
Gathering Data
It is up to the mapping function how this task is achieved. The only requirement is that the function gathers a set of tables.
The Mapping Step
This step is common to all mapping functions and is supported by a specialized mapping editor. The mapping step transforms the gathered set of tables into another set of tables. The mapping step supports the following operations:
- remove table: a table from the initial step can be removed / ignored
- remove column: drops a column from a table
- rename table: a table from the initial step can be renamed
- rename column: renames a column in a table
- add table: a table can be added by providing the name of an initial table
- add column: a column can be added to a table
- modify column: sets the column to a new expression (the default simply copies the original value 1:1 using $.columnname; please see the next section for more details on expressions)
- extract table: if an input table contains a column with array values, extracts the union of these arrays into a new table
The Save Step
The save step writes the output of the mapping step into the database. The following modes are supported:
-
Ignore: simply add the data (update in case the record already is in the DB, insert if not). We follow the "normal" update semantics meaning that key=null actually deletes the value in the DB, whereas missing keys remain untouched.
-
Refresh: all records from the target tables that have the _dj_source column matching the ID of this function are updated. If a key is no longer present in the new data, the record is deleted.
-
Delete All: all records from the target tables are deleted, if createSchema is true, the tables are also dropped in case columns are no longer needed or previously had another datatype.
Mapping Function Reference
ETL
The ETL function uses an expression as input into the mapping process. The expression result can be a map of table names to an array of rows (JSON objects). If the expression result has a simpler structure (for instance only a single table), the ETL function wraps this in a default table called "table".
Expressions
Expressions are small programs that can be used to:
- configure widgets on a page (the most common case)
- save an expression with an Invoke function
- attach triggers to database tables
This section describes the expression language's syntax and semantics are well as the built-in Dashjoin keywords.
JSONata
Expressions use the well established JSON query and transformation language JSONata. The JSONata exerciser shows three sections:
- the context data (this usually is the record you are browsing on the user interface)
- the expression
- the expression result
The JSONata documentation explains the language, the operators, as well as which built-ins are available.
Expression Editor
Expressions are used in various places throughout the platform. The next sections describe the different usage scenarios in more detail. Whenever an expression is to be edited on a form, Dashjoin allows you to do this via the expression editor component which is explained in this section.
The expression editor is a simple text field that shows context sensitive help and a result preview once you start typing.
As an example, you can navigate to the info page, enter the page edit mode and edit the user display widget. The widget displays the result of the following expression which projects the user field from the page context (the composition of the context is explained in the next section):
{"user": user}
Note that any expression must be prefixed with =. If you omit this, the system treats the value as a constant string and the expression editor will show the message: "Constant, prefix expressions with =".
If you delete the closing curly bracket, the system will tell you that the expression is invalid: line 1:13: missing '}'. Now enter the following expression that calls the built-in read:
$read()
The system will tell you about missing parameters: Arguments required: $read(database, table, pk1). Now change the expression to:
$read("northwind", "EMPLOYEES", 2)
Assuming you have the demo application installed, this will show the first 10 lines of JSON that contain the respective record in the employees table of the northwind database. Finally, setting the expression to
$
displays the entire page context.
JSONata in Widgets
When expressions are used in widgets, the context is the following JSON object:
{
  database: name of the the database we are on
  search: the search term (only set if we are on the search result page)
  table: name of the table we are on
  pk1: value of the first primary key column
  pk2: value of the second primary key column
  pk3: value of the third primary key column
  pk4: value of the forth primary key column
  user: the name of the user logged in
  email: the email of the user logged in (PaaS only)
  roles: the array of roles the user is in
  form: value entered in the custom form of the button widget
}
The expression is provided as the widget parameter via the layout editor.
The result is used depending on the widget and the expression field. The if parameter, for instance, expects a Boolean value in order to determine whether to show the widget or not. The display widget simply displays the expression result. Consult the widget reference for information about your use case.
JSONata in Invoke Functions
The Invoke function allows you to wrap an expression as a function.
The context is passed as the function parameter.
The expression is a configuration parameter of the function.
The result is returned to the function caller.
JSONata in Triggers
Triggers allow evaluating expression before or after a write operation on a table.
In this case, the context is defined as follows:
{
  command: create, update or delete
  database: CRUD on this DB
  table: CRUD on this table
  search: primary keys of the record, set for delete and update
  object: object to create or fields to update, set for update and create
}
The expression is defined with the table.
The result is ignored, unless the trigger function extends the AbstractDatabaseTrigger Java interface. In this case, we expect a Boolean value that aborts the write operation in case the value false is returned.
Dashjoin Expression Reference
In addition to the default JSONata builtin functions (see Function Library), the following Dashjoin functions are added (some internal functions are omitted - you can refer to the platform's info page for a full list):
| Function | Syntax | Returns |
|---|---|---|
| create | $create(database, table, pk1) | ID of the new record |
| read | $read(database, table, pk1) | The record |
| traverse | $traverse(database, table, pk1, fk) | Record(s) related to the current record via the property fk. If fk is a simple column name, fk is an outgoing foreign key and the single related record is returned. If fk is a full property ID like dj/database/table/column, then a list of records from that table that have a fk pointing to the current record are returned |
| update | $update(database, table, pk1, object) | |
| delete | $delete(database, table, pk1) | |
| call | $call(function, argument) | Dashjoin function result |
| query | $query(database, queryId, arguments) | Query result table |
| incoming | $incoming(database, table, pk1) | [{id: ID of the record where the link originates, pk: ID of the pk column, fk: ID of the fk column}, ...] |
| echo | $echo(any) | Prints the parameter to the log |
| crawl | $crawl(url) | Crawls the URL and returns all URLs listed there |
| doc2data | $doc2data(url) | Reads the URL (or list of URLs) and returns its content as structured JSON data by parsing CSV, JSON, or XML |
| load | $load(url) | Reads the URL (or list of URLs) and returns its content as text |
Access Control
Several other sections already touched on access control and how certain functionality is only allowed for certain roles. This section explains how roles are defined and how users are assigned to be in a role.
Info Page
The info page shows various system data. At the top of the page you find the username of the current user as well as the roles he or she is in. From there you also find a link to the roles dashboard and, on the PaaS offering, a link to the tenant users.
Roles Dashboard
The roles dashboard allows the administrator to define system roles along with the homepage for users in this role. You cannot pick arbitrary role names here. Unless you are using the Dashjoin Cloud, the names depend on the roles defined in the identity management system (IDM) you are using. If you change your container configuration to use windows authentication, your role names will be "Users", "Power Users", "Guests", etc. If you are using the Dashjoin Cloud, you can choose arbitrary role names and assign users to these roles using the tenant user dashboard.
Platform as a Service
Dashjoin offers a fully managed Platform as a Service available at https://my.dashjoin.com/.
Tenant User Dashboard
In the Dashjoin cloud, users can authenticate via OpenID. The tenant user dashboard allows you to control who has access to your Dashjoin tenant. Once a user requests access, his or her record shows up on this page. Once you set the active flag, they are allowed to login. Using this page, you can also assign which roles a user should be in. Specifically, it is possible to promote users to be co-administrators of the tenant.
Installation
Creating a local Admin User
After installing Dashjoin, no user is set up in the system. To set up the local development admin user, navigate to http://localhost:8080/#/setup.
Choose a name, a username, and the password. Example: Name 'Local Admin', username 'admin', password 'My.secure.pass!'
Note: this only works the very first time! After a development admin is created, no more local users can be created from the UI. To change or disable the local user, please edit or delete the files djroles.properties and djusers.properties in the application root directory.
The Dashjoin authentication is configured to allow log in using social Google or Github accounts, or to allow registration of users by e-mail and password (authentication via e-mail uses the Google Firebase authentication).
Opening the Dashjoin application
To access the application, navigate to http://localhost:8080
Installers
Installers for Windows, MacOS, and Linux are available at https://dashjoin.com/.
Docker
docker pull dashjoin/platform
docker run -p 8080:8080 dashjoin/platform
Point your browser to http://localhost:8080.
If you would like to make the registered databases and credentials persistent, you can mount the "model" folder:
docker run -p 8080:8080 -v PERSISTENT_FOLDER:/deployments/model dashjoin/platform
Build Locally
Prerequisites:
- Java (11 or later)
- Node (12 or later)
- Maven (3.6 or later)
- Angular CLI (11 or later)
- For Windows users: you need to create the symbolic link in "platform\dashjoin\src\main\resources\META-INF":
mklink /D resources ..\..\..\..\..\angular\dist\angular
Dashjoin uses Quarkus as runtime framework (https://quarkus.io). You can run your application in dev mode using:
platform/angular$ npm install [--legacy-peer-deps # required if nvm -version > 7.0!)
platform/angular$ ng build
platform$ mvn install
platform/dashjoin$ mvn compile quarkus:dev
Point your browser to http://localhost:8080.
You can use the provided launch file to directly run from within Eclipse (right-click on the launch file, "Run as" or "Debug as" -> "Dashjoin", note that you need to adjust your jdk, mvn, and working directory location in the file "Dashjoin.launch"). This requires the Eclipse Quarkus plugin (https://quarkus.io/blog/eclipse-got-quarkused/) and the Lombok plugin (https://projectlombok.org/setup/eclipse) to be installed. Launching with "Debug as" will also enable live coding mode.
The application can be packaged and installed locally using:
platform/dashjoin$ mvn package install
It produces the dashjoin-0.0.1-SNAPSHOT-runner.jar file in the /target directory. Be aware that it’s not an uber-jar as the dependencies are copied into the target/lib directory.
If you want to build an uber-jar, execute the following command:
platform/dashjoin$ mvn package -Dquarkus.package.type=uber-jar
The application is now runnable using java -jar target/dashjoin-0.0.1-SNAPSHOT-runner.jar.
Eclipse
The Eclipse IDE can be used to develop and debug locally. First install the Eclipse Quarkus tools.
After cloning the Github repository, you need to import at least the following Maven projects into the Eclipse workspace:
- dashjoin
- dashjoin-core
Optional additional modules:
- dashjoin-demo
- dashjoin-kafka
- dashjoin-mongodb
The Maven dependencies need to be initialized with (right click dashjoin project folder) -> Maven -> Update Project. The Angular UI must be built using the CLI, please refer to the previous section.
When everything was build successfully, you can use the Dashjoin.launch configuration to run or debug the platform. The Quarkus launcher supports hot loading of resources, i.e. any changes made will be adjusted at runtime without having to restart the platform. (Note: you will have to adjust the absolute folder references in the launch file to you own workspace settings)
Administration
This section describes administration and operating procedures for the Dashjoin platform.
Configuration Changes
A system is defined by the following configurations: Dashboards, layout pages, user roles, registered databases, and functions. These settings are stored in the configuration database. For the open source version, this data is kept on the file system in the model folder. In the docker container, this folder is located under /deployments/model. For locally installed systems, this folder can be found under USER_HOME/.dashjoin/model.
Query Performance
When hooking up large databases, you might have to perform some performance tuning in order for the platform to scale. The query performance page (/table/config/dj-query-performance) is linked from the main database page and helps you with this task. It shows recent query statistics in a table. The columns are defined as follows:
- query: shows the query that was run along with the database prefixed
- type:
- key: determining possible foreign key autocomplete values
- search: the toolbar search
- query: the query editor, tables or charts
- all: the all records table view
- read: read from an instance page
- update: update from an instance page
- create: create from a table page or the upload feature
- delete: delete from an instance page or the upload feature
- lastRun: the time the query was last run
- count: how often was the query run
- errorCount: of these, how often did an error occur (e.g. a timeout)
- lastError: the last error message
- totalTimeMs: the runtime in milliseconds all query runs took combined
- lastTimeoutMs: optional timeout set for the last run
- lastLimit: optional limit set for the last run (does not include limits in the query)
- averageTimeMs: the average time a query evaluation took in milliseconds
The table helps you to identify queries with long runtimes. Possible remedies are:
Creating Database Indices
All key columns should be indexed in the database in order to avoid full table sweeps when a record is accessed by its key.
Specific Search Queries
By default, Dashjoin will perform searches on all database tables which can be a very costly operation. If a database contains more data, you can either opt out of it being searched, or you can associate a query from the catalog to be used. For instance, you might want employees to be searchable by firstname or lastname, but other tables are not relevant for searches. In this case, you can define the following query:
select ID, NAME
from EMP
where NAME like concat(${search}, '%')
Note that the query must have a single parameter "search" in order to be used this way. The platform will run this query by replacing the search parameter with the contents of the search field.
Global Timeout Settings
Finally, the system configuration page allows setting some global contraints that prevent "rogue" queries to deteriorate the overall system and database performance.
Development / Production
If you use a Dashjoin system in production, we do not recommend making configuration changes like defining new queries or registering new user roles using the editors on the production system. Instead, you can setup multiple development systems where these changes are developed and tested.
You can put the model folder under version control by following these steps:
- create a repository, for instance on GitHub
- install Dashjoin locally
- clone the repository into your Dashjoib user home directory:
USER_HOME> git clone https://github.com/ORG/PROJECT.git .dashjoin
- start Dashjoin and start developing
- pull changes from others
- review and commit changes:
USER_HOME/.dashjoin> git status
On the production system, you can pull the changes using the same setup. If you are using containers, you can mount the model folder under /deployments/model.
Security
We strongly advise to:
- Consider using read-only database credentials when registering a database with data that is managed by another application
- When adding a new database, make sure the access control settings are setup correctly
- Restrict access to the system in case you store confidential data in any of the registered databases
- All credentials that are entered into the system are encrypted using strong SHA-256 encryption. The master key resides in the file model/.secrets.id on the web server. Keep this file secured
- Add a OpenID provider in order to authenticate organization users
In order to register new databases, the user must be in the "admin" role.
Supported Databases
In addition to the PaaS Firestore DB, we support all of the SQL databases out of the top 10 database engines:
| Database | Driver class | Driver version | Status |
|---|---|---|---|
| Oracle | oracle.jdbc.OracleDriver | 19.6.0.0.0 | beta |
| MySQL | com.mysql.cj.jdbc.Driver | 8.0.20 | beta |
| SQL Server | net.sourceforge.jtds.jdbc.Driver | 1.3.1 | beta |
| PostgreSQL | org.postgresql.Driver | 42.2.12 | |
| SQLite | org.sqlite.JDBC | 3.31.1 | |
| DB2 | com.ibm.db2.jcc.DB2Driver | 1.4.0 | beta |
| MS Access | net.ucanaccess.jdbc.UcanaccessDriver | 4.0.1 | beta |
| MariaDB | org.mariadb.jdbc.Driver | 2.6.0 | beta |
| H2 | org.h2.Driver | 1.4.196 | |
| Amazon RDS Aurora PostgreSQL | org.postgresql.Driver | 42.2.12 | beta |
| Amazon RDS Aurora MySQL | com.mysql.cj.jdbc.Driver | 8.0.20 | beta |
| Sybase (SAP) ASE 16.2 | net.sourceforge.jtds.jdbc.Driver | 1.3.1 | beta |
| SAP HANA | com.sap.db.jdbc.Driver | 2.5.49 | beta |
API
The Dashjoin architecture features an Angular Single Page Application (SPA) that is driven by RESTful APIs. The APIs support the OpenAPI standard. The OpenAPI description is available at https://demo.my.dashjoin.com/openapi. Dashjoin also ships the Swagger GUI at https://demo.my.dashjoin.com/swagger-ui. Please note that the API is subject to change.
The API requires any request using a local admin user to be authenticated with HTTP basic authentication:
curl -u admin:djdjdj http://localhost:8080/rest/manage/version
In order to login using an OpenID user, you need to specify a bearer token as follows:
curl -H "Authorization: Bearer ..." https://demo.my.dashjoin.com/rest/manage/version
The easiest way to obtain a bearer token is to login using a browser and copying the token via the browser development tools. Depending on your OpenID provider, a bearer token can also be obtained via a seperate login call.
Contribute
We welcome contributions. If you are interested in contributing to Dashjoin, let us know! You'll get to know an open-minded and motivated team working together to build the next generation platform.
- Join our Slack and say hello
- Follow us on Twitter
- Submit your ideas by opening an issue with the enhancement label
- Help out by fixing "a good first issue"


 197 Oct 15, 2022
 74 Sep 5, 2022
 100 Dec 13, 2022
 23 Dec 25, 2021
 179 Dec 22, 2022
 428 Dec 30, 2022
 31 Dec 4, 2022
 642 Dec 14, 2022
 189 Dec 6, 2022
 1k Dec 31, 2022
 20.2k Jan 5, 2023
 363 Dec 30, 2022
 500 Dec 8, 2022
 8.3k Dec 31, 2022
 1.3k Dec 29, 2022